- This topic is empty.
-
AuthorPosts
-
February 28, 2026 at 5:00 pm #112447
When people hear “10V cordless crimping tool,” they often assume it’s only for light tasks. In real electrical work, that assumption doesn’t hold up. A compact cordless crimper is usually chosen for a different reason: it fits the kind of jobs that happen in tight spaces, with repeated terminations, where consistency matters and a bench setup isn’t realistic.
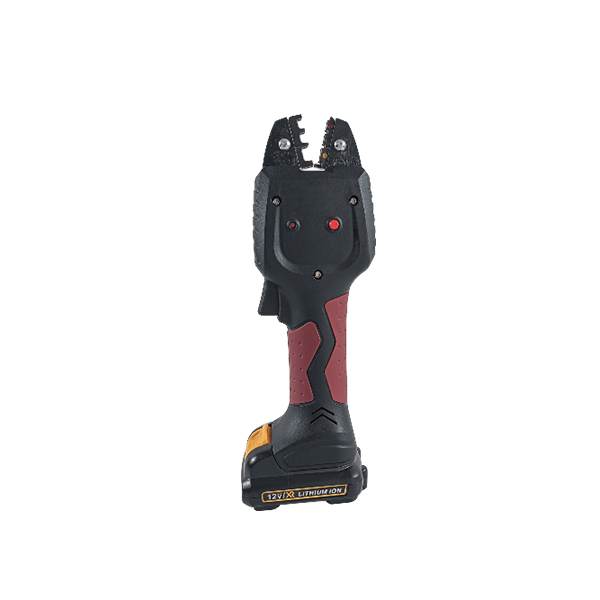
The B10EP50 (Order Code: 118514) is Kartrup’s compact option in this category. It’s built around a 10.8V 2.0Ah battery, supports interchangeable dies, includes white LED lighting for low-visibility areas, and uses a red LED to warn about power shortage. Its rated working temperature is -10°C to +40°C.
This guide walks through what those specs mean in daily use—how to plan a clean crimping workflow, where a 10V platform performs best, and how to avoid the common issues that lead to rework.
1) What the B10EP50 is designed to do (and what it isn’t)
The B10EP50 is a compact crimping platform meant to support common electrical termination work where access and speed matter:
-
Control cabinet wiring and panel build
-
On-site maintenance and service calls
-
Field installation where carrying a bench tool is unrealistic
-
Repetitive terminations where operator fatigue becomes a quality factor
From the product page, the tool’s maximum force is 15 kN, covering a 0.25–50 mm² section range (depending on die and application), with crimping speed under 1.5 seconds and a listed ~300 cycles as a reference test value.
What it’s not: a universal solution for every connector type and every high-force industrial termination. Like any crimp system, results depend heavily on die selection, connector specification, and proper positioning.
2) The “10V advantage” is control, not marketing
In compact electrical work, your biggest problems are usually:
-
You can’t align the terminal because you can’t see the crimp point well
-
The tool is too bulky to position squarely inside a cabinet
-
You end up twisting the cable just to make the tool fit
-
The operator’s grip angle changes from crimp to crimp, and results vary
A smaller cordless tool reduces those risks. It’s easier to hold steady, easier to place in line with the connector barrel, and easier to use repeatedly without “fighting the tool.” That translates to more consistent crimps across a shift—especially when multiple technicians are working on the same build standard.
3) Interchangeable dies: where the real flexibility comes from
The B10EP50 supports interchangeable dies, which is often the difference between a tool being “nice to have” and being something you can standardize across a team.
In practical terms, interchangeable dies help you:
-
Support multiple connector families without buying multiple tool bodies
-
Create a controlled die kit for specific jobs (panel wiring, rail work, service vans)
-
Reduce training time (one platform, consistent handling)
-
Improve traceability in procedures (“Use die X for connector Y”)
Best practice: treat dies like controlled process tooling. Store them labeled, keep a simple log (especially if your shop has IPC/ISO-style discipline), and don’t mix dies between connector systems unless they’re explicitly compatible.
4) LEDs aren’t “extra”—they’re quality-of-work features
The product page lists two LED functions:
-
White LED lighting for dark conditions
-
Red LED for power shortage
If you crimp in real cabinets, you know lighting is not optional. Many defects happen because the operator can’t confirm:
-
wire insertion depth
-
terminal seating
-
correct alignment before the cycle
White LED lighting improves visibility exactly where it matters. The red power indicator reduces the odds of starting a task with a weak battery and then dealing with interruptions or inconsistent operation.
5) Performance specs that matter on site
Here are the B10EP50 technical points worth translating into real workflow impact:
-
Force (15 kN max): tells you the tool is built for real crimping work, not hobby tasks. Still, your connector/die match is what determines acceptable results.
-
Section range (0.25–50 mm²): a wide stated range, but always confirm against the die and terminal spec you’re using.
-
Speed (<1.5 s): faster cycle times help on high-count termination work, but only when positioning is correct and repeatable.
-
Battery (10.8V 2.0Ah) + charge time (~30 min): supports a practical “one in use, one charging” workflow if you’re doing continuous work.
-
Working temperature (-10°C to +40°C): helpful for seasonal field work and non-climate-controlled workshops.
Also note the product page mentions cycle times are test-based and depend on die and conductor conditions. That’s a good reminder to validate with your own connectors.
6) A practical crimping workflow (field-friendly)
If you want consistent results, don’t rely on “feel.” Use a simple repeatable process:
Step A — Confirm connector + die pairing
Match the die to the connector family and conductor section. If your job involves multiple connector types, separate them into batches to avoid swapping mistakes.Step B — Prep the conductor correctly
Strip length matters. Too short reduces contact area; too long risks exposed strands or insulation pinch. Use a consistent stripper and check the first few pieces.Step C — Position before you crimp
Use the tool’s lighting to confirm alignment. Make sure the terminal barrel sits square in the die and the conductor is fully inserted.Step D — Post-crimp checks (fast but effective)
-
Visual check: deformation should look even and centered
-
Tug/pull check: not a full lab test, but a quick verification for assembly work
-
Fit check: does the terminal seat correctly in the housing or mating part?
These checks take seconds and prevent the worst kind of defect: the one discovered after the panel is closed or shipped.
7) What’s included and why it matters for deployment
The product page lists the standard supply contents:
-
Basic tool with a battery
-
Battery charge unit
-
Hexagon socket wrench
-
One crimping die
-
Plastic carrying case
For teams, this matters because it’s a ready “deployment kit” format. You can assign one case per workstation or service vehicle, and then build additional die sets based on your connector mix.
8) Where Kartrup fits in
Kartrup positions itself as a small, engineering & service-oriented company under the “Components · Methods” business, with two divisions—Components and Methods—focused on designing, manufacturing, and selling components and tools for overseas markets.
That kind of structure is relevant for tool users because a crimping tool is rarely purchased alone. In real operations, you need ongoing support around application matching, die selection, and consistent field usage—especially when multiple teams or sites are involved.
If you want to review the product directly, here’s the reference page: 10V Cordless Crimping Tools.
http://www.kartrupp.com
Kartrup -
-
AuthorPosts
- You must be logged in to reply to this topic.